
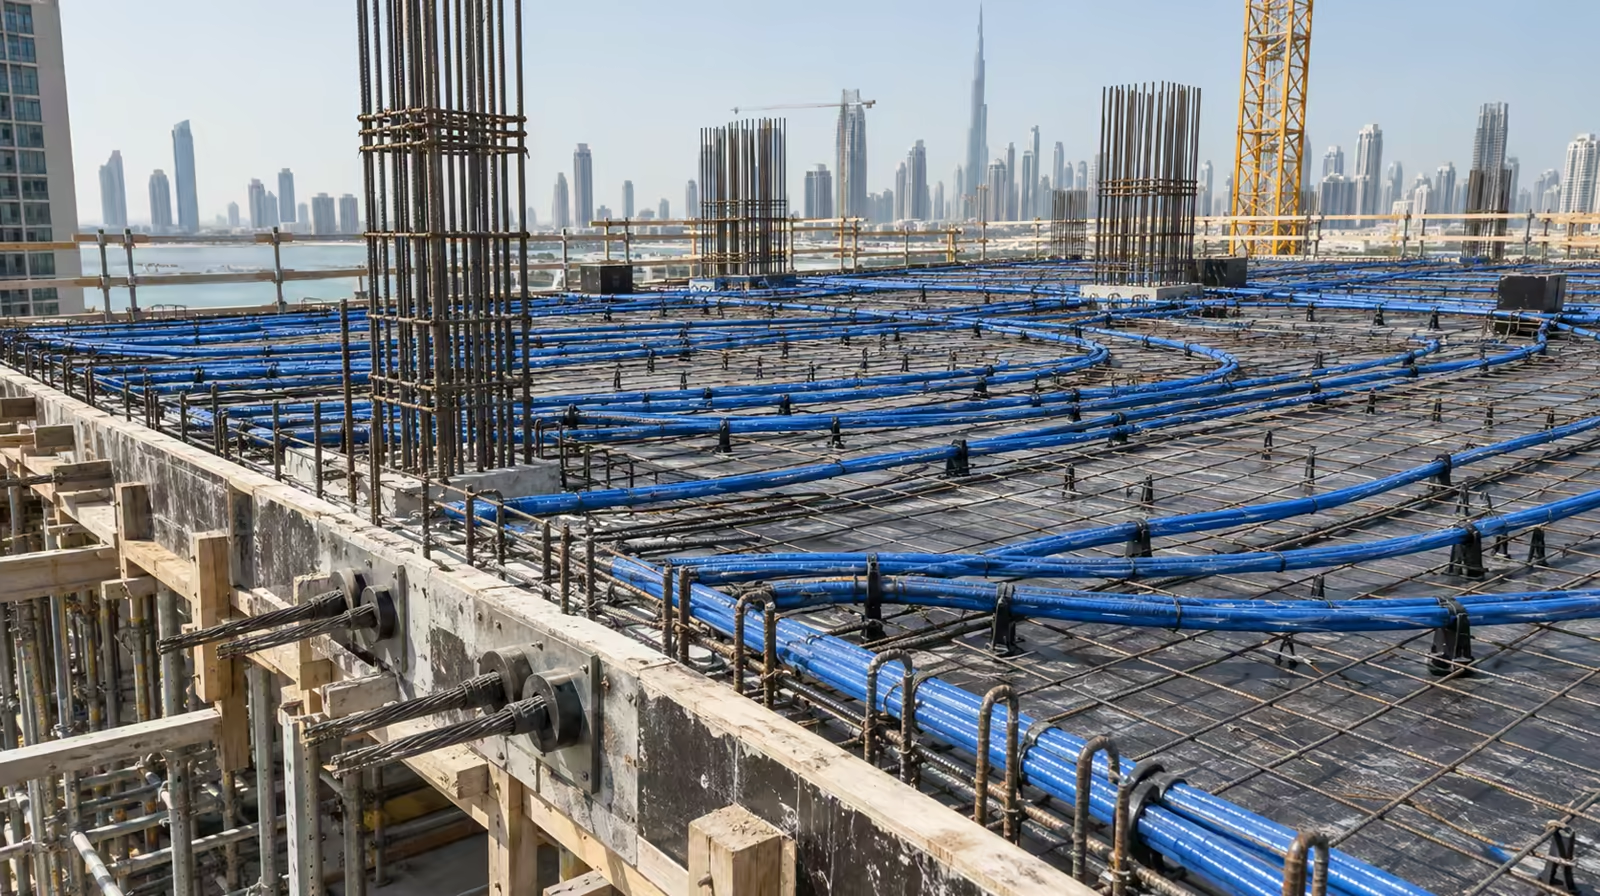
That one change is why a post-tensioned floor can span further, sit thinner and need fewer columns than a conventional reinforced concrete slab of the same footprint.
This guide covers the whole slab in one place: what it is, how it carries load, how to read its detail drawings, the slab types used on real buildings, how it is built, and where it does and does not suit a UAE project. Where a topic deserves its own deep dive, we link to it.
What Is a Post Tension Slab?
The short post tension slab definition: a reinforced concrete slab that also contains prestressing tendons, which are tensioned after the concrete has cured and anchored at each end, so that they hold the slab in permanent compression.
"Post" refers to the timing. In pre-tensioning, the steel is stretched before the concrete is cast, usually in a factory. In post-tensioning, the tendons are placed inside ducts, the concrete is poured around them on site, and only once it has gained enough strength are the tendons pulled tight and locked. The force then passes into the concrete through the anchorages.
A post-tensioned slab still contains ordinary rebar, usually less of it, at column heads, around anchorages and at openings. The tendons do the heavy structural work across the spans. The rebar handles the local conditions.
For the technique in general, beyond slabs, see what post-tensioning is and where it is used.
How Does a Post Tension Slab Work and Carry Load?
Two mechanisms work together.
Precompression. Concrete is strong in compression and weak in tension. A loaded slab bends, which puts its underside in tension, and that is where conventional slabs crack. Stressing the tendons squeezes the whole slab before any load arrives, so the tension from later loading has to cancel that squeeze before a crack can open. Average precompression in a building slab is modest, typically in the order of 1 to 2.5 N/mm², but it keeps the slab largely crack-free under service loads.
Load balancing. This is the reason the tendons are not straight.
Why the tendon profile is curved
Along its length, a tendon follows a gentle wave. It sits high over each support, drops low near midspan, and rises again over the next support, mirroring how the slab wants to bend under its own weight.
When a curved tendon is pulled tight, it tries to straighten. Held inside the concrete, it cannot, so it pushes upward on the slab along its sagging length. That upward push acts directly against gravity. For a parabolic drape, the upward load works out as 8 times the tendon force times the drape, divided by the span squared. More drape or more force means more load cancelled.
As typical industry guidance, designers balance somewhere between 60 and 80 per cent of the slab's dead load. Under that condition the slab sits nearly flat, and only the remaining load produces bending.
This is why tendon geometry matters so much. A tendon placed 20mm too low over a column loses part of the balancing force it was meant to deliver, which is why profile heights are checked before every pour. How much prestressing steel all this takes is covered in how the steel ratio in a post-tensioned slab is calculated.
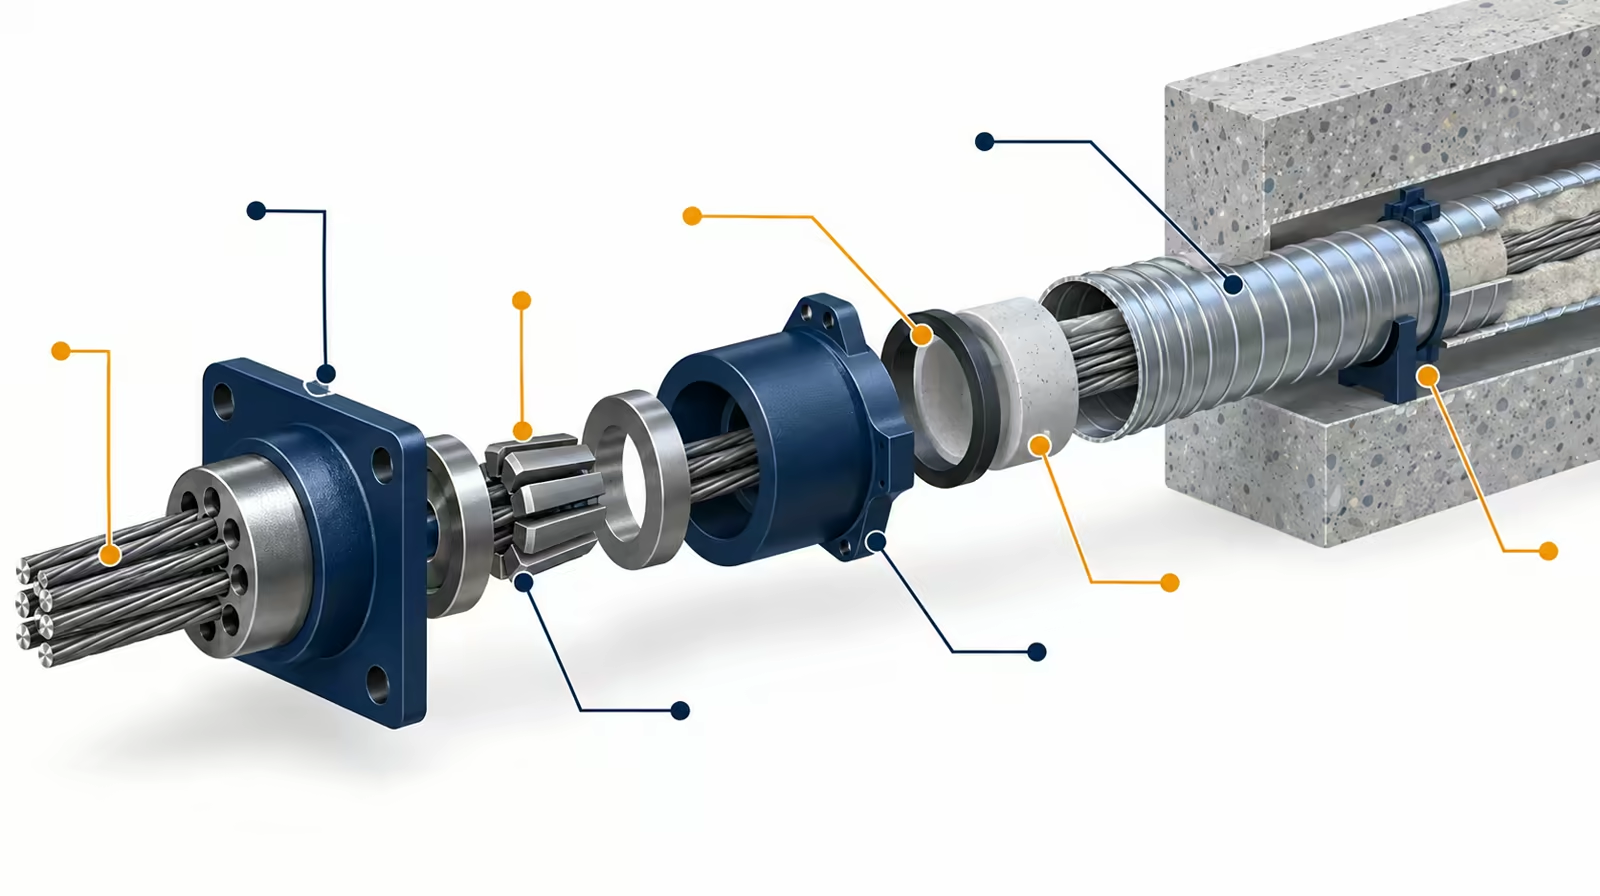
The parts every post tension slab detail shows: strand, duct, anchorages and grout.
How Do You Read Post Tension Slab Details on a Drawing?
Post tension slab details are the drawings that turn a structural design into something a site crew can install. Consultants reviewing a submission and contractors pricing one see the same family of details. The drawings are produced as part of post-tension design and shop drawings; this section is about reading them.
Post tension slab section detail
The typical section shows everything stacked in the slab depth: bottom reinforcement, the duct carrying the tendon, the chair supporting it, top reinforcement, and the cover to each layer. Two sections are usually drawn, one at the high point over a support and one at the low point near midspan.
What to check: that cover suits the fire rating and exposure the consultant specified, and that the duct, both rebar layers and any embedded services genuinely fit. On a 220mm slab there is less spare room than people expect.
Tendon profile and elevation
The profile drawing shows each tendon in elevation, with its height above the soffit at the high points, the low points and the inflection points where the curve reverses. Heights are given either to the underside of the duct or to the strand centre, and the drawing should say which.
What to check: the height reference, and whether the profile is coordinated with the top steel at column heads, where the tendon reaches its highest point exactly where the rebar is most congested.
Live-end and dead-end anchorage details
The live end is where the jack grips and stresses the strand. Its detail shows the anchor casting or bearing plate, the trumpet guiding the strands in, the wedges that lock them, the pocket former that recesses the anchor behind the slab edge, and the bursting reinforcement, usually spirals or hairpin bars, that controls the very high local force behind the plate.
The dead end is anchored before the pour and never touched again. On bonded systems it is commonly a bulb or "onion" anchorage, with strand ends splayed and embedded in the concrete, or a plate with pre-seated wedges.
What to check: edge distances, spacing between anchorages, the bursting steel, and room for the jack at every live end. Component specifications sit in post-tension slab materials explained.
Banded versus distributed tendon layout
The layout plan shows where every tendon runs. On a two-way flat slab, the common arrangement is banded in one direction and distributed in the other. Banded tendons are grouped tightly along column lines, acting like a hidden shallow beam. Distributed tendons are spread evenly across the slab in the other direction, draping over the bands.
This avoids weaving tendons over and under each other in both directions, which makes installation far simpler. Codes cap distributed spacing: ACI 318, for example, limits it to the lesser of eight times the slab thickness or about 1.5 metres.
What to check: strands per tendon, a tendon reference linking each one to its profile and stressing schedule, and the stressing end of every tendon.
Chairs, profile heights and ducts
Chairs hold the tendon at its designed height during the pour. The chair schedule gives the height at each support point and the spacing, typically around a metre, close enough to stop the duct sagging under foot traffic. Heights should be numbers a fixer can set with a tape. Most profile errors on site are chair errors.
Building slabs in the UAE normally use flat oval ducts, which keep the tendon as high or as low as possible in a thin slab, typically carrying up to four or five 12.7mm strands. The duct detail shows joints, seals, grout inlets and vents. Vents belong at the profile high points, where air collects.
Edge and opening details
Edge details show the U-bars and bursting steel around live-end anchorages, plus any cantilever reinforcement. Opening details show tendons deflected around a hole in a gentle curve, with trimmer bars around the opening. Small openings fit best between distributed tendons; lift and stair cores shape the whole layout from the start.
What to check: that every MEP opening on the services drawings appears on the PT layout. A missed opening is the most common reason a slab later gets cored near a tendon.
Pan box pockets
Where a live end cannot be stressed from the slab edge, at a boundary wall or a construction joint for example, it is stressed from a pocket in the top surface instead. The pan box is the former that creates that pocket. Its detail shows dimensions, position relative to the tendon and the reinforcement around the recess. After stressing, strand tails are cut and the pocket is filled with non-shrink mortar.
Which Types of Post-Tensioned Slab Are Used in Buildings?
The tendons are the constant. What changes is the shape of the concrete around them.
Post-tensioned flat plate slab
A slab of uniform thickness sitting directly on its columns, with no drops or beams. It gives the cleanest soffit and is the most common form on mid-rise residential buildings. Its weak point is punching shear at the columns, resolved with shear studs, local reinforcement or a slightly thicker slab.
Post tensioned flat slab with drop panels
A post tensioned flat slab with drop panels adds a local thickening at each column head, exactly where punching shear and hogging moments peak, letting the rest of the slab stay thinner. It adds formwork complexity, but on heavier loads or longer spans it is often more economical.
Band beams, and are beams used in post-tensioned slabs?
Yes, though rarely as deep downstands. A banded beam slab uses wide, shallow post-tensioned beams along one set of column lines, with a thinner one-way slab between them. It suits long rectangular grids, car parks especially. Full-depth post-tensioned beams also appear as perimeter beams and, above all, as transfer beams where the column grid changes between floors. See podium and transfer slabs.
Ribbed and waffle slabs
Ribs in one direction (ribbed) or two (waffle) under a thin topping cut self-weight and allow very long spans. They are less common on UAE residential work because of formwork cost, but appear on larger commercial and institutional floors.
Post-tensioned slab-on-grade
A ground-bearing slab post-tensioned to control cracking and allow large joint-free areas. It is common on industrial floors elsewhere, but in UAE building work it remains a niche application.
Bonded or Unbonded: Which System Do UAE Projects Use?
Both systems use the same kind of strand. The difference is what surrounds it afterwards.
In an unbonded system, each strand is greased and sheathed in plastic at the factory, stressed, locked off and never grouted. Installation is fast and light, and the system is widely used in North American building work.
In a bonded system, several strands run inside a flat duct that is pumped full of cement grout after stressing, bonding the strand to the concrete along its whole length.
On UAE building projects, bonded flat-duct systems are the more commonly specified option, and they are what we install. Three reasons stand out:
Durability. Coastal humidity and chlorides make corrosion protection a first-order concern, and a fully grouted duct gives the strand continuous alkaline cover.
Behaviour if cut. A severed bonded tendon stays anchored by the grout either side of the cut, so the loss of prestress is local. An unbonded tendon loses its force along its whole length.
Ultimate strength. Bonded tendons develop higher stress at failure, generally reducing supplementary reinforcement.
The trade-off is a dependence on good grouting, since a void inside a duct is invisible once the work is done. See the post-tension grouting procedure and our grouting works service.
What Does Post Tension Slab Construction Look Like on Site?
The sequence is consistent from slab to slab, and each step has its own guide.
1. Formwork and bottom reinforcement, as on a conventional slab.
2. Tendon installation. Ducts laid to plan, chairs set to profile, strands threaded, anchorages fixed, all alongside the rebar fixing. See the tendon installation process.
3. Top reinforcement and pre-pour inspection of profile heights, anchorages, duct joints and vents.
4. Concrete pour and curing, taking care not to displace ducts or damage anchorages.
5. Stressing, once cube results confirm the specified transfer strength, with each elongation recorded against its calculated value. Many projects apply an early partial stress to control shrinkage cracking, then final stressing. See how post tension slabs are stressed and elongation monitoring.
6. Cutting, grouting and pocket filling.
7. Testing and sign-off, compiling cube, stressing and grouting records. See cube testing and consultant sign-off.
Props are not struck on a fixed number of days either. Back-propping and stripping follow the stressing sequence and the engineer's instructions.
Where Does Post-Tensioning Suit UAE Buildings?
Mid-rise residential on a fixed plot. The G+M+4+R and G+4+R blocks going up around Al Yasmeen and Al Jurf in Ajman are typical. A thinner slab with no downstand beams gives cleaner apartment layouts and better clear height, and where a building works to a height or floor limit, the saved depth can matter more than the material saving.
Parking below, residential above. A car park wants an open column grid; the apartments above want columns where their layout suits. Where the two disagree, a transfer structure is needed, and post-tensioning keeps it shallow enough not to swallow the parking headroom. This is much of what drives post-tensioning in dense districts such as Business Bay and Dubai Marina, where towers routinely sit on podium parking.
Longer spans and fewer columns. As typical industry guidance, a post-tensioned flat slab spans roughly 40 to 45 times its depth, against roughly 28 to 32 for conventional reinforced concrete. The detail is in how thick a post-tensioned slab needs to be.
Large villas with open plans, where long column-free living spaces are wanted. See post-tensioning for villas with large spans.
Whether it also saves money depends on the spans, the loads and what the saved depth is worth. That comparison has its own page: post tension slab vs conventional slab cost.
What Are the Honest Limitations of a Post Tensioned Floor Slab?
Post-tensioning is a trade, not a free upgrade.
Coordination has to happen early. Tendon layouts are fixed before the pour, so every service opening and sleeve must be known at design stage. A post tensioned floor slab forgives late changes less readily than a conventional one.
Drilling and coring need care. Cutting into a stressed slab blind can damage a tendon. Cores and deep fixings in an existing slab should follow scanning, which our inspection and testing service covers.
Restraint cracking. The slab shortens as it is stressed and as it shrinks and creeps. Stiff walls and cores that resist this can cause cracking unless pour strips, stressing sequence and joints are designed for it.
It needs a specialist crew. A slab stressed or grouted by an inexperienced team can look identical on the surface and be far less durable underneath. Later alteration or demolition also needs specialist engineering. For warning signs on existing slabs, see warning signs an existing slab needs investigation.
It is not worth it everywhere. On a small building with short spans, conventional reinforced concrete is often the better answer, and we would rather say so at the start.
What the numbers looked like on our recent Ajman projects
Across these four buildings, slabs ran between 220mm and 280mm thick, and the prestressing steel ratio was typically around 55 kg/m³, with a range of about 55 to 80 kg/m³ where spans or loads demanded more. The deeper slabs sat at parking and transfer levels, not on the upper residential floors. The full stories are in our Al Yasmeen case study and Al Jurf case study, with an overview of our post-tensioning work in Ajman.